> ## Documentation Index
> Fetch the complete documentation index at: https://docs.7qr.codes/llms.txt
> Use this file to discover all available pages before exploring further.
# Local Development
> A guide on how to run Dub.co's codebase locally.
 ## Introduction
Dub's codebase is set up in a monorepo (via [Turborepo](https://turbo.build/repo)) and is fully [open-source on GitHub](https://github.com/dubinc/dub).
Here's the monorepo structure:
```
apps
├── docs
├── web
packages
├── tailwind-config
├── tinybird
├── tsconfig
├── ui
├── utils
```
The `apps` directory contains the code for:
* `web`: The entirety of Dub's application ([app.dub.co](https://app.dub.co)) + our link redirect infrastructure.
* `docs`: Dub's documentation site ([dub.co/docs](https://dub.co/docs)) – including this page you're on right now!
The `packages` directory contains the code for:
* `tailwind-config`: The Tailwind CSS configuration for Dub's web app.
* `tinybird`: Dub's Tinybird configuration.
* `tsconfig`: The TypeScript configuration for Dub's web app.
* `ui`: Dub's UI component library.
* `utils`: A collection of utility functions and constants used across Dub's codebase.
## How `app.dub.co` works
Dub's web app is built with [Next.js](https://nextjs.org) and [TailwindCSS](https://tailwindcss.com).
It also utilizes code from the `packages` directory, specifically the `@dub/ui` and `@dub/utils` packages.
All of the code for the web app is located in here: [`main`/apps/web/app/app.dub.co](https://github.com/dubinc/dub/tree/main/apps/web/app/app.dub.co). This is using the Next.js [route group pattern](https://nextjs.org/docs/app/building-your-application/routing/route-groups).
There's also the API server, which is located in here: [`main`/apps/web/app/api](https://github.com/dubinc/dub/tree/main/apps/web/app/api)
When you run `pnpm dev` to start the development server, the app will be available at [http://localhost:8888](http://localhost:8888). The reason we use `localhost:8888` and not `app.localhost:8888` is because Google OAuth doesn't allow you to use localhost subdomains.
## How link redirects work on Dub
Link redirects on Dub are powered by [Next.js Middleware](https://nextjs.org/docs/app/building-your-application/routing/middleware).
To handle high traffic, we use Redis to cache every link's metadata when it's first created. This allows us to serve redirects without hitting our MySQL database.
Here's the code that powers link redirects:
* Link redirects: [`main`/apps/web/lib/middleware/link.ts](https://github.com/dubinc/dub/blob/main/apps/web/lib/middleware/link.ts).
* Root domain redirects: [`main`/apps/web/lib/middleware/root.ts](https://github.com/dubinc/dub/blob/main/apps/web/lib/middleware/root.ts).
## Running Dub locally
To run Dub.co locally, you'll need to set up the following:
* A [Tinybird](https://www.tinybird.co/) account
* An [Upstash](https://upstash.com/) account
* A [PlanetScale](https://planetscale.com/)-compatible MySQL database
## Step 1: Local setup
First, you'll need to clone the Dub.co repo and install the dependencies.
First, clone the [Dub.co repo](https://d.to/github) into a public GitHub repository.
```bash Terminal theme={null}
git clone https://github.com/dubinc/dub.git
```
Run the following command to install the dependencies:
```bash Terminal theme={null}
pnpm i
```
If you're planning to make changes to [Dub.co's Docs](/docs), you'll need to install the [Mintlify CLI](https://mintlify.com/docs/development) to build the documentation site.
```bash Terminal theme={null}
pnpm install -g mintlify
```
## Step 2: Set up Tinybird Clickhouse database
Next, you'll need to set up the [Tinybird](https://tinybird.co) Clickhouse database. This will be used to store time-series click events data.
In your [Tinybird](https://tinybird.co/) account, create a new Workspace.
Copy your `admin` [Auth Token](https://www.tinybird.co/docs/concepts/auth-tokens.html). Paste this token as the `TINYBIRD_API_KEY` environment variable in your `.env` file.
In your newly-cloned Dub.co repo, navigate to the `packages/tinybird` directory.
Install the Tinybird CLI with `pip install tinybird-cli` (requires Python >= 3.8).
Run `tb auth` and paste your `admin` Auth Token.
Run `tb push` to publish the datasource and endpoints in the `packages/tinybird` directory. You should see the following output (truncated for brevity):
```bash Terminal theme={null}
$ tb push
** Processing ./datasources/click_events.datasource
** Processing ./endpoints/clicks.pipe
...
** Building dependencies
** Running 'click_events'
** 'click_events' created
** Running 'device'
** => Test endpoint at https://api.us-east.tinybird.co/v0/pipes/device.json
** Token device_endpoint_read_8888 not found, creating one
** => Test endpoint with:
** $ curl https://api.us-east.tinybird.co/v0/pipes/device.json?token=p.ey...NWeaoTLM
** 'device' created
...
```
You will then need to update your [Tinybird API base URL](https://www.tinybird.co/docs/api-reference/api-reference.html#regions-and-endpoints) to match the region of your database.
From the previous step, take note of the **Test endpoint** URL. It should look something like this:
```bash Terminal theme={null}
Test endpoint at https://api.us-east.tinybird.co/v0/pipes/device.json
```
Copy the base URL and paste it as the `TINYBIRD_API_URL` environment variable in your `.env` file.
```bash Terminal theme={null}
TINYBIRD_API_URL=https://api.us-east.tinybird.co
```
## Step 3: Set up Upstash Redis database
Next, you'll need to set up the [Upstash](https://upstash.com) Redis database. This will be used to cache link metadata and serve link redirects.
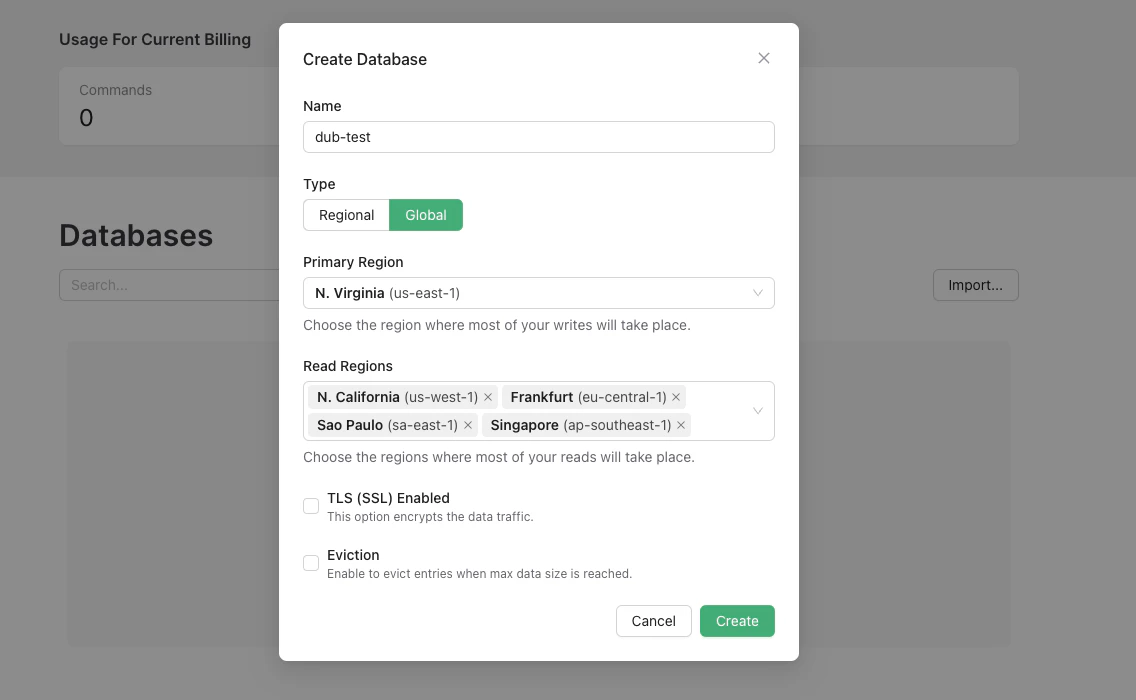
In your [Upstash account](https://console.upstash.com/), create a new database.
For better performance & read times, we recommend setting up a global database with several read regions.
## Introduction
Dub's codebase is set up in a monorepo (via [Turborepo](https://turbo.build/repo)) and is fully [open-source on GitHub](https://github.com/dubinc/dub).
Here's the monorepo structure:
```
apps
├── docs
├── web
packages
├── tailwind-config
├── tinybird
├── tsconfig
├── ui
├── utils
```
The `apps` directory contains the code for:
* `web`: The entirety of Dub's application ([app.dub.co](https://app.dub.co)) + our link redirect infrastructure.
* `docs`: Dub's documentation site ([dub.co/docs](https://dub.co/docs)) – including this page you're on right now!
The `packages` directory contains the code for:
* `tailwind-config`: The Tailwind CSS configuration for Dub's web app.
* `tinybird`: Dub's Tinybird configuration.
* `tsconfig`: The TypeScript configuration for Dub's web app.
* `ui`: Dub's UI component library.
* `utils`: A collection of utility functions and constants used across Dub's codebase.
## How `app.dub.co` works
Dub's web app is built with [Next.js](https://nextjs.org) and [TailwindCSS](https://tailwindcss.com).
It also utilizes code from the `packages` directory, specifically the `@dub/ui` and `@dub/utils` packages.
All of the code for the web app is located in here: [`main`/apps/web/app/app.dub.co](https://github.com/dubinc/dub/tree/main/apps/web/app/app.dub.co). This is using the Next.js [route group pattern](https://nextjs.org/docs/app/building-your-application/routing/route-groups).
There's also the API server, which is located in here: [`main`/apps/web/app/api](https://github.com/dubinc/dub/tree/main/apps/web/app/api)
When you run `pnpm dev` to start the development server, the app will be available at [http://localhost:8888](http://localhost:8888). The reason we use `localhost:8888` and not `app.localhost:8888` is because Google OAuth doesn't allow you to use localhost subdomains.
## How link redirects work on Dub
Link redirects on Dub are powered by [Next.js Middleware](https://nextjs.org/docs/app/building-your-application/routing/middleware).
To handle high traffic, we use Redis to cache every link's metadata when it's first created. This allows us to serve redirects without hitting our MySQL database.
Here's the code that powers link redirects:
* Link redirects: [`main`/apps/web/lib/middleware/link.ts](https://github.com/dubinc/dub/blob/main/apps/web/lib/middleware/link.ts).
* Root domain redirects: [`main`/apps/web/lib/middleware/root.ts](https://github.com/dubinc/dub/blob/main/apps/web/lib/middleware/root.ts).
## Running Dub locally
To run Dub.co locally, you'll need to set up the following:
* A [Tinybird](https://www.tinybird.co/) account
* An [Upstash](https://upstash.com/) account
* A [PlanetScale](https://planetscale.com/)-compatible MySQL database
## Step 1: Local setup
First, you'll need to clone the Dub.co repo and install the dependencies.
First, clone the [Dub.co repo](https://d.to/github) into a public GitHub repository.
```bash Terminal theme={null}
git clone https://github.com/dubinc/dub.git
```
Run the following command to install the dependencies:
```bash Terminal theme={null}
pnpm i
```
If you're planning to make changes to [Dub.co's Docs](/docs), you'll need to install the [Mintlify CLI](https://mintlify.com/docs/development) to build the documentation site.
```bash Terminal theme={null}
pnpm install -g mintlify
```
## Step 2: Set up Tinybird Clickhouse database
Next, you'll need to set up the [Tinybird](https://tinybird.co) Clickhouse database. This will be used to store time-series click events data.
In your [Tinybird](https://tinybird.co/) account, create a new Workspace.
Copy your `admin` [Auth Token](https://www.tinybird.co/docs/concepts/auth-tokens.html). Paste this token as the `TINYBIRD_API_KEY` environment variable in your `.env` file.
In your newly-cloned Dub.co repo, navigate to the `packages/tinybird` directory.
Install the Tinybird CLI with `pip install tinybird-cli` (requires Python >= 3.8).
Run `tb auth` and paste your `admin` Auth Token.
Run `tb push` to publish the datasource and endpoints in the `packages/tinybird` directory. You should see the following output (truncated for brevity):
```bash Terminal theme={null}
$ tb push
** Processing ./datasources/click_events.datasource
** Processing ./endpoints/clicks.pipe
...
** Building dependencies
** Running 'click_events'
** 'click_events' created
** Running 'device'
** => Test endpoint at https://api.us-east.tinybird.co/v0/pipes/device.json
** Token device_endpoint_read_8888 not found, creating one
** => Test endpoint with:
** $ curl https://api.us-east.tinybird.co/v0/pipes/device.json?token=p.ey...NWeaoTLM
** 'device' created
...
```
You will then need to update your [Tinybird API base URL](https://www.tinybird.co/docs/api-reference/api-reference.html#regions-and-endpoints) to match the region of your database.
From the previous step, take note of the **Test endpoint** URL. It should look something like this:
```bash Terminal theme={null}
Test endpoint at https://api.us-east.tinybird.co/v0/pipes/device.json
```
Copy the base URL and paste it as the `TINYBIRD_API_URL` environment variable in your `.env` file.
```bash Terminal theme={null}
TINYBIRD_API_URL=https://api.us-east.tinybird.co
```
## Step 3: Set up Upstash Redis database
Next, you'll need to set up the [Upstash](https://upstash.com) Redis database. This will be used to cache link metadata and serve link redirects.
In your [Upstash account](https://console.upstash.com/), create a new database.
For better performance & read times, we recommend setting up a global database with several read regions.
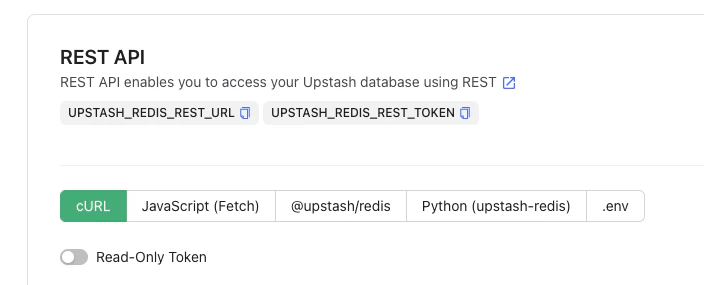
 Once your database is created, copy the `UPSTASH_REDIS_REST_URL` and `UPSTASH_REDIS_REST_TOKEN` from the **REST API** section into your `.env` file.
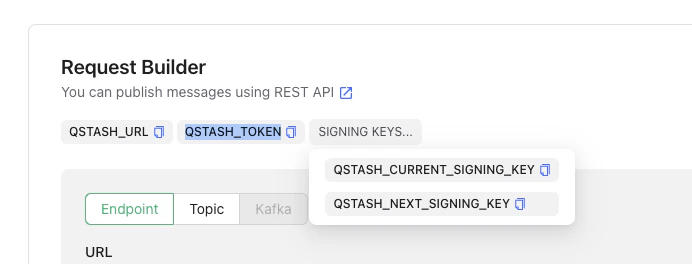
 Navigate to the [QStash tab](https://console.upstash.com/qstash) and copy the `QSTASH_TOKEN`, `QSTASH_CURRENT_SIGNING_KEY`, and `QSTASH_NEXT_SIGNING_KEY` from the **Request Builder** section into your `.env` file.
 If you're planning to run Qstash-powered background jobs locally, you'll need to set up an Ngrok tunnel to expose your local server to the internet.
Follow [these steps](https://ngrok.com/docs/getting-started/) to setup `ngrok`, and then run the following command to start an Ngrok tunnel at port `8888`:
```bash Terminal theme={null}
ngrok http 8888
```
Copy the `https` URL and paste it as the `NGROK_URL` environment variable in your `.env` file.
## Step 4: Set up PlanetScale MySQL database
Next, you'll need to set up a [PlanetScale](https://planetscale.com/)-compatible MySQL database. This will be used to store user data and link metadata. There are two options:
### Option 1: Local MySQL database with PlanetScale simulator (recommended)
You can use a local MySQL database with a PlanetScale simulator. This is the recommended option for local development since it's 100% free.
Prerequisites:
* [Docker](https://www.docker.com/products/docker-desktop)
* [Docker Compose](https://docs.docker.com/compose/install/)
In the terminal, navigate to the `apps/web` directory and run the following command to start the Docker Compose stack:
```bash Terminal theme={null}
docker-compose up
```
This will start two containers: one for the MySQL database and another for the PlanetScale simulator.
Add the following credentials to your `.env` file:
```
PLANETSCALE_DATABASE_URL="http://root:unused@localhost:3900"
DATABASE_URL="mysql://root:@localhost:3306/planetscale"
```
Here, we are using the open-source [PlanetScale simulator](https://github.com/mattrobenolt/ps-http-sim) so the application can continue to use the `@planetscale/database` SDK.
While we're using two different values in local development, in production or staging environments, you'll only need the `DATABASE_URL` value.
In the terminal, navigate to the `apps/web` directory and run the following command to generate the Prisma client:
```bash Terminal theme={null}
npx prisma generate
```
Then, create the database tables with the following command:
```bash Terminal theme={null}
npx prisma db push
```
### Option 2: PlanetScale hosted database
PlanetScale recently [removed their free
tier](https://planetscale.com/blog/planetscale-forever), so you'll need to pay
for this option. A cheaper alternative is to use a [MySQL database on
Railway](https://railway.app/template/mysql) (\$5/month).
In your [PlanetScale account](https://app.planetscale.com/), create a new database.
Once your database is created, you'll be prompted to select your language or Framework. Select **Prisma**.
If you're planning to run Qstash-powered background jobs locally, you'll need to set up an Ngrok tunnel to expose your local server to the internet.
Follow [these steps](https://ngrok.com/docs/getting-started/) to setup `ngrok`, and then run the following command to start an Ngrok tunnel at port `8888`:
```bash Terminal theme={null}
ngrok http 8888
```
Copy the `https` URL and paste it as the `NGROK_URL` environment variable in your `.env` file.
## Step 4: Set up PlanetScale MySQL database
Next, you'll need to set up a [PlanetScale](https://planetscale.com/)-compatible MySQL database. This will be used to store user data and link metadata. There are two options:
### Option 1: Local MySQL database with PlanetScale simulator (recommended)
You can use a local MySQL database with a PlanetScale simulator. This is the recommended option for local development since it's 100% free.
Prerequisites:
* [Docker](https://www.docker.com/products/docker-desktop)
* [Docker Compose](https://docs.docker.com/compose/install/)
In the terminal, navigate to the `apps/web` directory and run the following command to start the Docker Compose stack:
```bash Terminal theme={null}
docker-compose up
```
This will start two containers: one for the MySQL database and another for the PlanetScale simulator.
Add the following credentials to your `.env` file:
```
PLANETSCALE_DATABASE_URL="http://root:unused@localhost:3900"
DATABASE_URL="mysql://root:@localhost:3306/planetscale"
```
Here, we are using the open-source [PlanetScale simulator](https://github.com/mattrobenolt/ps-http-sim) so the application can continue to use the `@planetscale/database` SDK.
While we're using two different values in local development, in production or staging environments, you'll only need the `DATABASE_URL` value.
In the terminal, navigate to the `apps/web` directory and run the following command to generate the Prisma client:
```bash Terminal theme={null}
npx prisma generate
```
Then, create the database tables with the following command:
```bash Terminal theme={null}
npx prisma db push
```
### Option 2: PlanetScale hosted database
PlanetScale recently [removed their free
tier](https://planetscale.com/blog/planetscale-forever), so you'll need to pay
for this option. A cheaper alternative is to use a [MySQL database on
Railway](https://railway.app/template/mysql) (\$5/month).
In your [PlanetScale account](https://app.planetscale.com/), create a new database.
Once your database is created, you'll be prompted to select your language or Framework. Select **Prisma**.
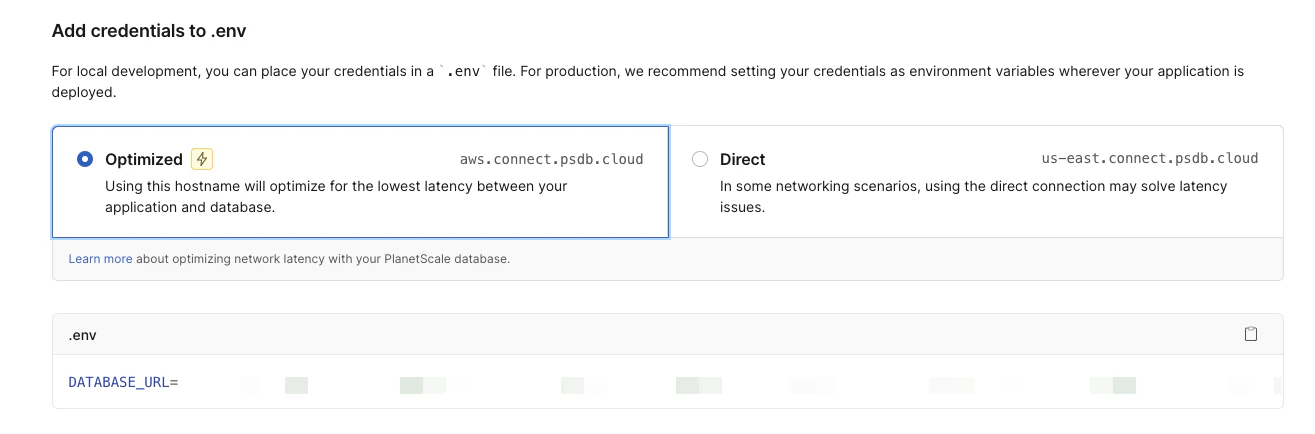
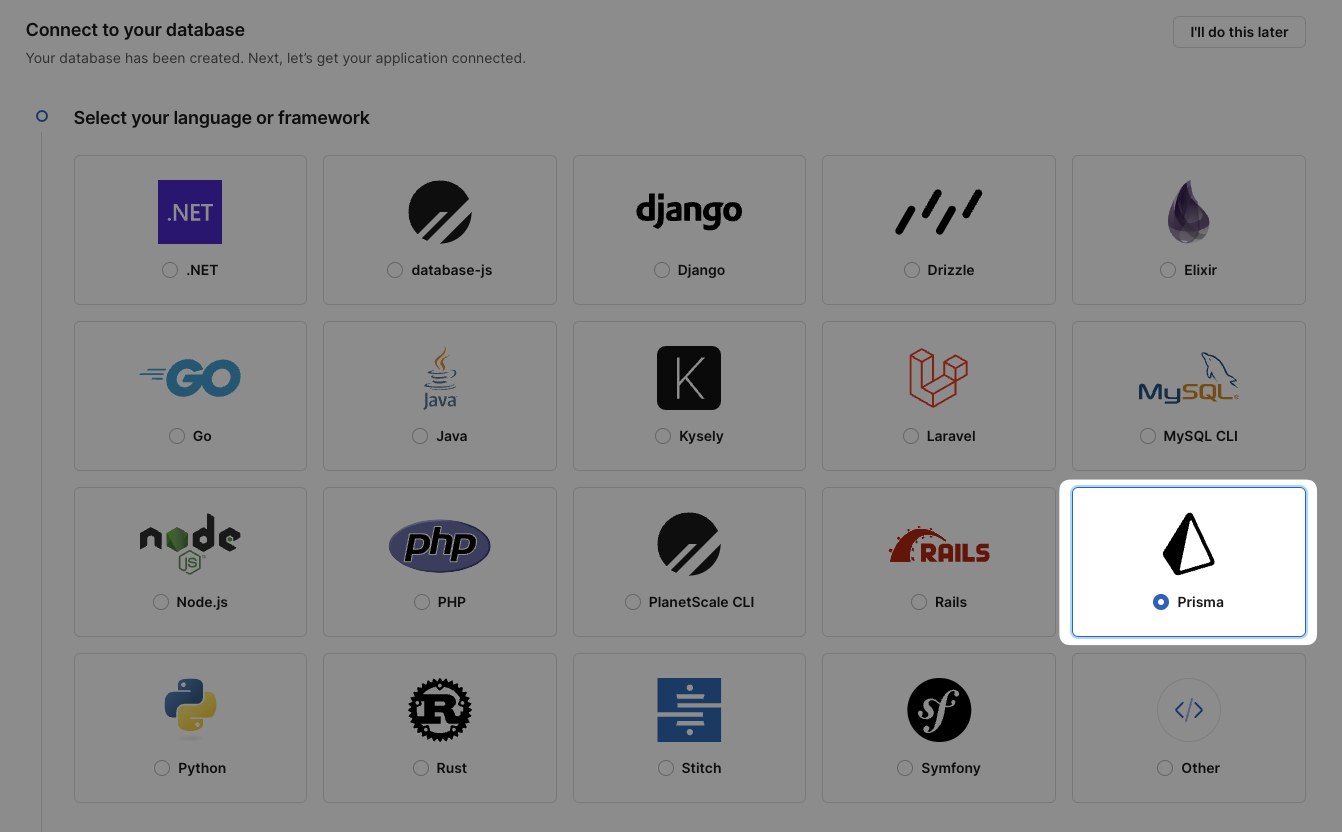 Then, you'll have to create a new password for your database. Once the password is created, scroll down to the **Add credentials to .env** section and copy the `DATABASE_URL` into your `.env` file.
 In the terminal, navigate to the `apps/web` directory and run the following command to generate the Prisma client:
```bash Terminal theme={null}
npx prisma generate
```
Then, create the database tables with the following command:
```bash Terminal theme={null}
npx prisma db push
```
## Step 5: Set up GitHub OAuth
Next, follow [these steps](https://docs.github.com/en/apps/oauth-apps/building-oauth-apps/authorizing-oauth-apps) to create a GitHub App. This will allow you to sign in to Dub.co with your GitHub account.
Don't forget to set the following Callback URL:
```
http://localhost:8888/api/auth/callback/github
```
Once your GitHub App is created, copy the `Client ID` and `Client Secret` into your `.env` file as the `GITHUB_CLIENT_ID` and `GITHUB_CLIENT_SECRET` environment variables.
## Step 6: Start the development server
Finally, you can start the development server. This will build the packages + start the app servers.
```bash Terminal theme={null}
pnpm dev
```
The web app (`apps/web`) will be available at [localhost:8888](http://localhost:8888) and the docs (`apps/docs`) will be available at [localhost:3334](http://localhost:3334).
In the terminal, navigate to the `apps/web` directory and run the following command to generate the Prisma client:
```bash Terminal theme={null}
npx prisma generate
```
Then, create the database tables with the following command:
```bash Terminal theme={null}
npx prisma db push
```
## Step 5: Set up GitHub OAuth
Next, follow [these steps](https://docs.github.com/en/apps/oauth-apps/building-oauth-apps/authorizing-oauth-apps) to create a GitHub App. This will allow you to sign in to Dub.co with your GitHub account.
Don't forget to set the following Callback URL:
```
http://localhost:8888/api/auth/callback/github
```
Once your GitHub App is created, copy the `Client ID` and `Client Secret` into your `.env` file as the `GITHUB_CLIENT_ID` and `GITHUB_CLIENT_SECRET` environment variables.
## Step 6: Start the development server
Finally, you can start the development server. This will build the packages + start the app servers.
```bash Terminal theme={null}
pnpm dev
```
The web app (`apps/web`) will be available at [localhost:8888](http://localhost:8888) and the docs (`apps/docs`) will be available at [localhost:3334](http://localhost:3334).